Wednesday, July 29, 2015

Peter's Mandola

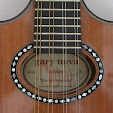
Peter’s Mandola has now been completed and is safely residing with its sibling. I liked Peter's description of his new mandola, "Magnificent!" That'll do for me!
 I must admit that I enjoyed playing it- already looking forward to doing the next one! I think that as designer/maker (of anything) you should always evaluate what you’ve made and where necessary make modifications the next time around; that’s how your work evolves and improves. At this stage of my luthiery career there are no longer major design changes just subtle tweaks and there have been a few tweaks to my mandola’s overall design since the last one, all of which worked out extremely well.
For those of you who are interested, here are some more choice photos and some of the instrument’s details. Oh and scroll down for the obligatory video!

410mm scale length; neck/body joint at 13th fret.
35mm nut width.
Maple neck with walnut laminations, carbon fibre inserts.
Sitka spruce soundboard with bound sound hole.
Black walnut back and sides fully bound in maple.
Indian rosewood fretboard, compound radius, wide gold evo frets.
Rosewood bridge with bone saddle.
Handmade Nava designed tailpiece.

If you are interested in commissioning your own mandola, you’ll find contact details etc on my website.

Labels: , , , ,

Tuesday, December 03, 2013

Mandola and Octave Mandolin, now completed!

Adrian’s mandola and octave mandolin are now completed and below are some photos for you.
And here’s a video with a short demo just to tease you!
 There are a few more photos on my website and details of pricing for those who are interested ;-)

Labels: , , , , ,

Tuesday, November 26, 2013

Mandola and octave mandolin components

Here are the last few components for Adrian’s mandola and octave mandolin. The bridges have removable bone saddles; although I always set-up my instruments, to what I consider the optimum, you never know if someone at some point will want to raise or lower the action and a removable saddle does allow for this.
Those with keen eyes will notice that although the tailpieces look similar, the octave’s is slightly longer in both directions. For the side that anchors the tailpiece, this is entirely aesthetic and for the string side, this is to reduce the amount of open string between the saddle and tailpiece. Both the nuts are bone too. I’ve tried various synthetic materials, but always come back to bone.

Labels: , , ,

Wednesday, November 13, 2013

Busy, busy, busy.....

The next step for Adrian’s pair is to get them set-up and playing “in the white”. I’m using rosewood for the bridges for two reasons. Firstly, from an aesthetic perspective it will match all the other rosewood used and I think that using a limited palette of woods makes for a much more coherent design. Secondly, rosewood is lighter than ebony and as these bridges have to be made a little wider than normal (to allow for the transducer to run through it and for extra string tension) it’s a good way to cut down on the mass of the bridge.
 The bridge has to be fitted to the curvature of the soundboard, so after some rough shaping, the final fitting is done like thus……………
Feeler gauges help to ensure a good fit.
Then we are into making the tailpiece, nut, fitting tuners and going through the set-up procedure.
You can see the Headway transducer poking out of the sound hole; this won’t be fitted until I’m 100% sure of the final bridge position. Drilling a hole through the soundboard has a certain finality to it!
 I’m very pleased with the clean look of the tailpiece, just two screws and the jack socket. It would be silly not to use the jack socket as an anchoring point as essentially it’s a 12 mm bolt going through the end block.

I’ve also just bent the sides of Ian’s model 2 guitar. As the shape is asymmetrical and made up of four parts, as much time goes into planning the bending of the sides, as into the bending itself!
You can see that the mould comes apart to make the whole process a wee bit easier.
As always the sides get bent on my trusty bending iron.
 Now we wait for them to dry out thoroughly before the various blocks are fitted and glued in place………….

Labels: , , , , , ,

Thursday, November 07, 2013

A couple of photos for you

The construction work on Adrian’s mandola and octave mandolin is now complete and the next stage will be making the bridges and tailpieces. They make a handsome couple, don’t they?

Labels: , ,

Wednesday, October 30, 2013

Nomenclature

I recently posted on the Mandolin Café forum that I was making a “tenor and octave”.  As Mandolin Café members are mainly USA based, this caused some confusion, as Shaw said, England and America are two countries separated by a common language!
In the UK the tenor mandola is the instrument which is tuned to a fifth below the mandolin, in the same relationship as that of the viola to the violin but in USA it’s simply called a mandola. It makes perfect sense to me just to call it a mandola, why use two words when one describes it accurately.
And of course many in the UK call the octave mandolin (USA) an octave mandola, which doesn’t make much sense as it’s tuned an octave below a mandolin and not a mandola!  D’oh!
This got me thinking about the naming of my instruments; so below is Adrian’s mandola with all the construction work complete.

Labels: , , ,